Create A Web Site Using FrontPage 2003
Introduction
FrontPage 2003
is a powerful web authoring program which lets you design your own
web site using a What-You-See-Is-What-You-Get (WYSIWYG) interface. This means
you can see your site as you design it. You can also easily add special effects,
create and use templates which will automatically adjust to your pages, and even
upload the web site to your FTP server. If you would like to design the site
using HTML yourself, you can also do so in FrontPage 2003's code view. FrontPage
2003 allows you to view the page in your web browser, or right in FrontPage itself
to see how it will look.
Please Note: FrontPage Extensions and SharePoint
Support is not possible on Active Web Hosting servers. As a result, there
are features in FrontPage 2003 which may not work when you upload your site to
your FTP server. However, you can still use FrontPage 2003 to create and upload
a working web site without needing to use these features.
Site Setup
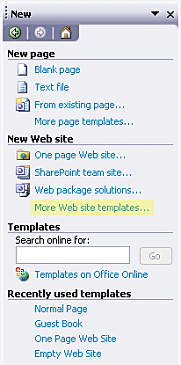
Click on the File Menu and select New. A sidebar will appear to the right.
Under the New Web Site area, click on More Web site templates.
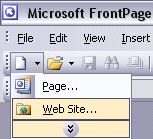
Alternatively, you can click on the New Document icon on the far left in
the toolbar and choose Web Site.
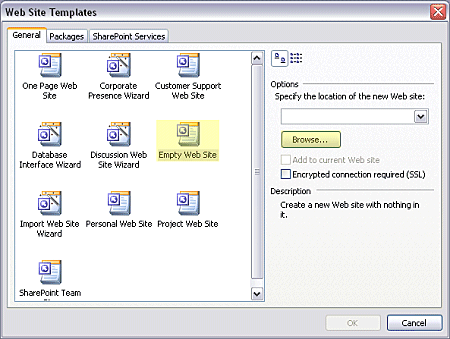
In the Web Site Templates window, General Tab, click Empty Web Site. Note
that you could try one of the other choices, such as Personal Web Site, which
would automatically create all the pages for you. However, we'd like to show you
how to create your own custom made pages so that you can adapt this to
virtually any type of site you'd like to create. Also note that some of the other
choices, such as the Customer Support Site, the site Wizards and SharePoint type
sites won't work on Active Web Hosting Servers as we do not support these features.
On the right, under Options, click Browse. Navigate to where you want
to put the files you'll create for your new web site. Keep in mind you are
creating your site offline and on your hard drive, and will upload them
after you are done creating your site.
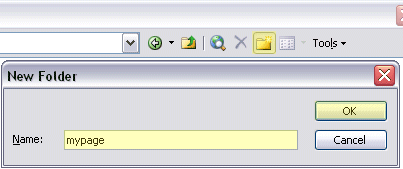
You can navigate to any directory and create another directory for your site by
clicking on the New Directory icon in the toolbar, or right click in the
directory and choosing New then clicking on Folder. For this
tutorial, we'll name the new directory mypage. Click on the OK
button then click on the Open button.
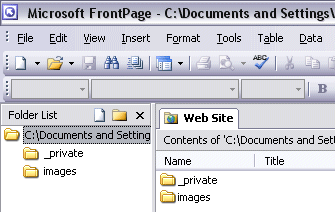
Back in the Web Site Templates window, click the OK button. You'll
now see a directory listing both on the right and the left. There's two
folders, _private and images.
Planning Your Site
When creating a site, it's nice to plan ahead what type of site you want to make
and what pages to put on it. We have a nice tutorial on planning your web site
called Web Site Creation and
Design which you may want to look at before you go any further. For this
tutorial, we'll start with a simple home page called My Home Page.
FrontPage 2003 has a nice feature that lets you plan out your site and pages
before you work on it. You can give each page priority ratings so you know which
ones you need to do first. At the bottom of the screen you'll see a row of
options. Click on the one at the end named Tasks.
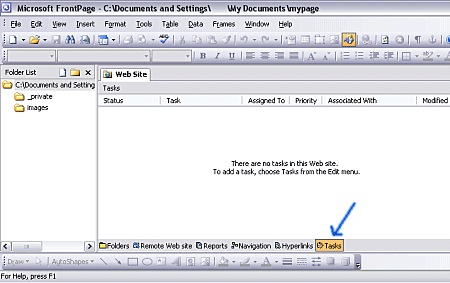
Now you can choose Tasks from the Edit menu (you may need to click
on the arrows at the bottom of the menu to see the Tasks menu) and then select
Add Task, or just right click in the main window area and select Add
Task.
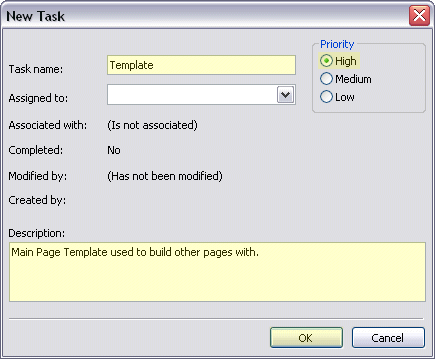
In the Task Name box type in the name of the task. The first task we'll
do is the Template. We'll set this as high priority because we want to do
this first before we do any of the other pages. In the Description box, type in
a description for the page to remind you what the page is for.
You can create tasks for the rest of the pages of the site by, setting the
priority to maybe medium for each. If you ever need to change the title,
description or priority of a task, then you can just double-click on the task to
bring up the window to make changes.
Index:
News & updates, counter
About Me:
A few words about yourself, maybe a photo.
Hobbies:
Things I like to do in my free time.
Links:
Links to other sites you enjoy visiting.
Contact:
A page or link to your email address so people can contact you.
If you ever need to change the title, description or priority of a task, then
you can just double-click on the task to bring up the window to make changes.
Getting Familiar With The Interface
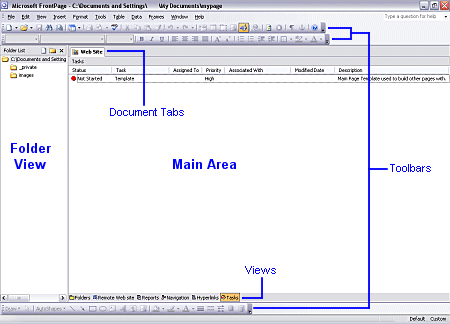
Before we continue, it's helpful to get more familiarized with some of FrontPage's
common tools. In the top of the window, you'll see two tool bars under the menu.
The top toolbar has a series of icons for different FrontPage program functions.
The second toolbar is a formatting toolbar which has some common text and web page
tools. In addition, there is a row of words at the bottom of the screen followed
by another toolbar. You can hover your mouse over each icon or area to see a
tooltip description of each one. Please do this now to learn them as we will be
referencing some of them by name later on. Note that some icons may be greyed
out or disabled depending on what type of area you are in (ie. tasks, web site,
etc.)
Creating A Template
A template is a document from which you can use to build your web page from. It's
always a good idea to have all your web pages share the same basic look, color,
layout and navigational menu. By creating a template, you can then copy this
file and rename it to the filename of your new page. After that, all you'll need
to do is simply fill in the content of the web page. This way you do not have
to create the whole page style and look all over again for every page. Save the
template when you're done creating your site in case you wish to add more pages.
Select the Folders view at the bottom of the screen. You'll see the same
thing in the Main Area as you do in the Folders View. Right click in the main
area and select New, then select Blank Page. Type in the file name
as TEMPLATE.html and answer yes to any prompts.
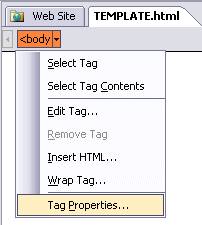
Double click on the new file and you'll see an empty text area, with the
body tag under the document tabs. Hover your mouse over this tag and click
the arrow that appears on the right of it. Then select Tag Properties.
Note that you can do this for any tag that appears in this row. Clicking
items in your document will cause certain tags to appear or disappear.
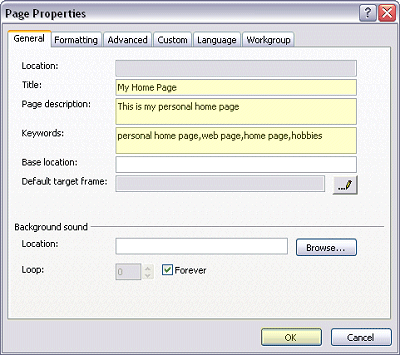
The General Tab
This is where you set up the parts of your page which search engines would see.
It's always good to at least set a Title, which is also shown in the
web browser's title bar. A page description and keywords are a good thing to add
so that search engines can correctly index your page. This is especially important
if you happen to be creating a business or other site that depends heavily on
gaining visitors to your site.
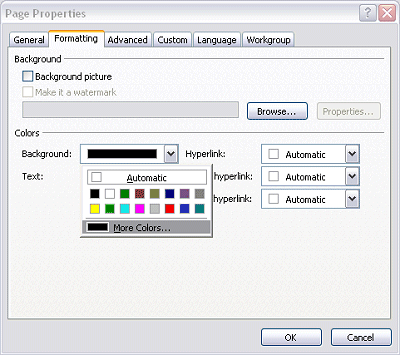
The Formatting Tab
This is where you can choose your page background and colors. If you want, you
can choose virtually any color by clicking on the drop down box next to
the item, then clicking on More colors. For this tutorial, however, we
choose colors that were available in the drop down box such as black for text,
blue for the links, navy blue for visited links and teal for active links. For
the background you can choose a custom color by double-clicking on the color
choice (like Hex={CC,FF,FF} which is what we used), or even click on the box
next to Background Picture, and then choose Browse to navigate to
and select a pattern image of your choice.
The Advanced Tab
Here you can further customize the page display. In this tutorial we won't be
filling in any of the items in this section, but you can experiment with them
if you wish. However, we will set some properties for the overall page.
Click the Body style... button. We'll set up the font for the entire web
site. Click the arrow on the right on the the Format button. Choose
Font. Select Arial, Normal 10pt (do not confuse this with 10px which is
smaller. px stands for pixels where pt stands for point). For the
color, choose the black (far top left) from the drop down box. In the
Effects box, click No text decoration. Click the OK button
for this window and then again for the next window.
In the Styles area, click on the box next to Enable hyperlink rollover
effects. Click the Rollover Style... button. This area lets you
customize how a link will look when the mouse is moved over the link. You can
choose the font, style, color, size and effects. For example, to use the site's
default font, and size, we won't choose any values for those boxes. We'll set
the style to normal and then you can choose a color you like. We used the
same teal color we chose for the Active Link above. Click in the box next
to No text decoration to ensure that no underlining or other effects
occur in the links.
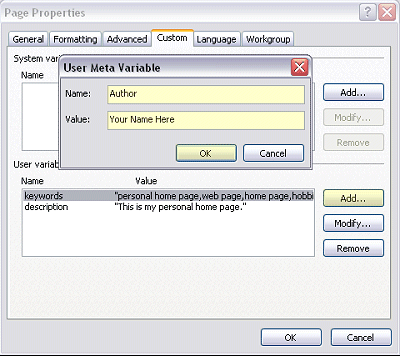
The Custom Tab
In the Custom tab, you can add more meta tags here. We can add one
by clicking the Add... button at the bottom in the User variables
area. Let's type in Author in the Name box, then type in your name
in the Value box. Click the OK button when done. You'll see your
new one added to the list.
The Language Tab
It's usually good to set the language of the page so that search engines can
correctly categorize your site and maybe provide translation services if someone
should search and find your site. For example, in the Page language area,
set the Mark current document as: to English and be sure to choose
the right English version from your country from the drop down box, if you are
in an English-speaking country.
The Workgroup Tab
If you are on a network and are creating this site with the help of others, this
tab has options to let you select the category this site falls under (or create
a new category), who is assigned to oversee the project, and the review status
(pending, approved, denied, etc. or make your own). If you use this area, it's
usually best not to check the box next to Exclude this file when
publishing the rest of the Web site since you want to publish your pages.
Often, it's best to set the template file to Don't Publish (which we'll
show you how to do later) after you've created your entire web site.
When you're done setting the page options, click the OK button. Then click
in the main area to change it from black to white again (ie. deselecting it).
The Main Table
We are going to create a table which will hold the top banner which describes
your site, the left-side navigation menu and finally, the main content area of
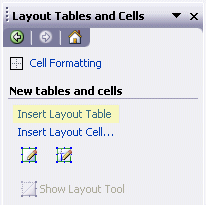
your pages. From the Table menu, click on Layout Tables and Cells.
You'll see a panel appear on the right. While FrontPage has several layouts you
can choose from, let's learn how to create our own. Click on Insert Layout Table
under New tables and cells.
A table will appear in the main area of your page, and it will have tabs with
numbers noting width and height. Also at the top you'll see the table tag.
Hover over this tag, click on it's arrow on the right and select Tag Properties.
We'll use 2 rows and 2 columns for the size, Center alignment, Specify width of
750 pixels, and a border size of 0. Don't click OK yet.
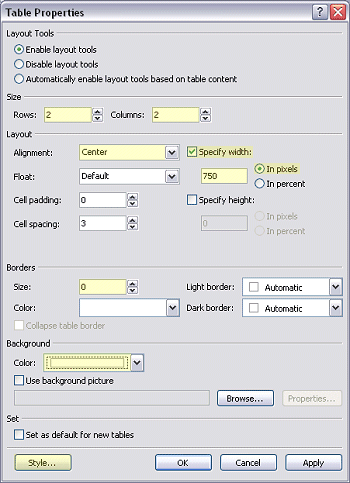
Click on the Style button, then click on the Format button and
choose Font. Select Arial, normal, 10pt, color black, No Text Decoration
and click the OK button in this and the next window. Now you'll see the
table is split into 4 equal quarters. Click on the 'X' in the upper right of the
Layout Tables and Cells panel on the right so that you can see more of the
table. It should appear centered on your page.
We will first join the top two cells and resize it to make a top banner. Click
in the top left cell. Now hold down the mouse button and drag to the right, to
select the top two cells. Right click in the selected area and choose
Merge Cells. Click anywhere in the top large cell to deselect the cells.
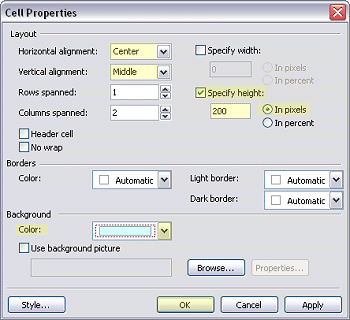
Right click in the top large cell and select Cell Properties. Choose
Center for Horizontal alignment, Middle for vertical alignment, click in the
box next to Specify height (if not already selected) and specify a height of 200
pixels. Now you can also choose a background color. We decided on the same light
blue as the background. Notice that when you choose a color, there are some
colors under Document Colors. These are the colors you're currently using
in the document, making it easier to choose colors you've already used. Click
OK when done. You'll now see the resized top banner area.
Click in the top cell. In the bottom toolbar, select the Insert WordArt tool (the
blue 3D "A" icon). Select a style you would like to use for the title of your
web site. Then choose a text style and size. It's recommended to use a thick
font (such as Impact or Arial Black) and a size of around 60 pixels. You can
use larger or smaller text, depending on how long your title is. When you click
OK, the title appears in the top cell. You can further customize the text
using the buttons in the toolbox that is now displayed on the screen. You can
also resize the text by dragging the handles found on all sides and corners of
the box surrounding the text. The yellow diamond will let you adjust any text
warping and the green dot at the top will let you rotate the text. When done,
simply click in another cell and the toolbox and box/handles around the text will
disappear.
Click in the bottom left cell and choose Cell Formatting. You'll see a
box appear on the right side of the screen. Choose a width of 150, and VAlign
set to Top and the background set to any color you would like. We used a
light yellow, for example. The Borders width should be set to 0. Now click on
the first icon under Apply to apply settings to all boarders.
Click on Cell Corners and Shadows. Use a corners width and height of 10.
Choose your background color and border color (from the Document Colors, you could
choose the color you used for this cell's background). Now click the first icon
under Apply, which looks like a circle cut into 4 quarters.
Under Shadows, choose a width of 5, and click on the first icon under
Apply, to apply bottom and right shadow.
Click on Cell Header and Footer. Select the BgColor colors.
This should be what you selected for the corners.
Click in the bottom right cell, which will be our content area. Click on the 'X'
in the right-side panel to close it so we can see the page better. Right click
in the bottom right cell and choose Cell Properties. Select Justify
for the horizontal alignment, Top for vertical alignment, uncheck
Specify height, and choose a background color of white.
Click the Style button, then the Format button and select borders.
Choose the solid style, color black, width of 1. For the padding, choose
4 for left, right, top and bottom. Click OK buttons until you are back
to your main area of your web page (closing all dialog windows). You have now
created the main table layout.
Navigation Menu
If you look in your Tasks (clicking on the word at the bottom of the
screen), you'll see the list of pages you made note of. We'll create a link for
each one of these. Let's start with the Home page, which will be linked
to the index.html file. Start by clicking inside your navigation menu.
In the top toolbar, select Arial text, 10 pt. Type in the word Home. Next
select the word and click on the Insert Hyperlink icon in the topmost
toolbar. Type in index.html in the Address box and click the OK
button. Don't worry if the page or file doesn't yet exist. Click after the new
link to put the cursor at the end of the word and press ENTER. Now you
can type in your next link. Do this for each page you wish to create.
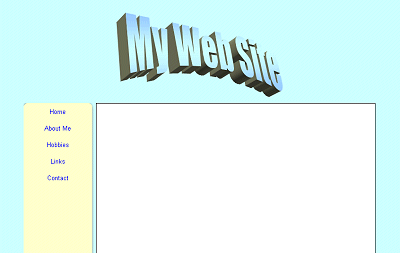
To view your page, click on the Preview link at the bottom of the screen.
So far, we have built up a site that looks like this:
Saving Your Template
You should save your work at intervals as you go along, so that if something
should happen that you lose power or make a change you don't like, you can
revert back to the saved image. Go back to the Design view by clicking on
it at the bottom of the screen. Right click on the tab TEMPLATE.html and
select Save. Since we have created some images, we'll be asked where we
want to save them. Click on Change Folder. Double click on the images
folder then the OK button. Now you'll see each image will be put in the
images folder. Click OK again to save your page and images. Your
template is now complete and ready to use. You'll want to note this in your
Tasks view. Go there and right click on the Template task. Choose
Mark Complete. Now Right click on the TEMPLATE.html tab and
select Close.
Using The Template
Now we are ready to create a web site using our new template. Anytime you want
to use the template to create a new page, right click on the TEMPLATE.html
file in the Folder View and choose Copy. Then click in a blank area in
the Folder View and choose Paste. Right click on the newly created file
(which would be something like TEMPLATE_copy(1).html) and choose Rename
to rename the file to a new name. Be sure to rename it exactly as the filename
you specify in your navigation menu for the page you wish to create. To start
with, we'll name this new file index.html since we'll start with the main
page of the site. This is the page that visitors will see when they type your
domain name into their web browser. Double click on this new file to open it.
Click in the lower right cell which is the main content area (in our example, it's
the white boxed area under the top banner). Now just type in anything you would
like to say in this area. You can also make more links in the same way you did
when creating the Navigation Menu area.
Inserting Images
If you wish to insert an image, you can click on the Insert ClipArt or
the Insert Picture From File icon from the bottom toolbar. If you want to
resize your image, you can click on the image and then drag one of the handles.
If you right click on an image and choose Picture Properties, you can
choose how the image will be displayed and how close text will appear to the
image. It's also best to click the Genearl tab and type in a brief
image description in the Text box under Alternative representations.
This helps those who use screen readers to know what is on your page, even if
they can't see the images.
Inserting a Counter
You can insert a counter at the bottom of your page. Just scroll down to the
bottom and click outside the table area at the bottom. Choose your font
size, style, color and choose to center your text (use the center text
icon in the 2nd toolbar on the top).
Type in the words: visitors since and then the date you plan to upload
your site. Now click to the left of the word visitors to place the cursor
before it. Click on the Code view button at the bottom of the screen.
You'll see a lot of HTML code but find the cursor placed to the left of the word
visitors. Press the ENTER key twice, then the up arrow once to get
the cursor in the black space. Here you can add the code for your visit counter.
To learn how to install our own, please see
Installing A Visit Counter. Click
the Design or Preview view to see your changes. Note that your
counter may or may not appear on the page. It will appear properly when you have
uploaded your web site. Be sure to save your page and close it when done. Note
that you can also have more than one page open if you choose. Be sure to mark
the Task for Home Page as complete to keep track of your project.
Creating A Contact Page With An Email Form
Let's create a contact page. Create a new page from the template file as mentioned
previously. Rename it contact.html or whatever you named the file when
you created your navigation menu.
Type the word Contact Me at the top of the main content area. You might
want to use slightly larger than normal text, maybe a different color, and/or
maybe bold text. This text should be centered but you could have it positioned
anywhere you like. Note that when you press the ENTER key, the font style
does not change back to it's previous state. You'll have to reset the
font color, style and position again for any other text you wish to add.
It's best to have an introduction, such as reminding your visitors that they
must type in an email address or their mail will not be sent. This is a
safegaurd that the email bot uses to ensure valid submissions.
Click on the Code view at the bottom of the screen and press ENTER
twice and position the cursor on the blank line. Now enter the code from our tutorial
Using Form Mail To Create E-Mail Feedback Forms.
Make any necessary changes as the tutorial recommends.
Click on the Design view at the bottom of the screen. Right click inside
the form and select Table Properties. Choose Center for the Layout
Alignment. You now have an email form which people can use to contact you.
Be sure to mark your Contact page task as complete to keep track of your project.
Creating Your Other Pages
You now have all the skills to create your other pages in FrontPage. Be sure to
save your work as you go along. We encourage you to experiment with some of
FrontPage's other features. Do keep in mind that any webbot, SharePoint or
Database type feature will not work with Active Web Hosting's servers. Once you
complete a page, be sure to mark it's task as complete so that you can keep
track of your project.
Uploading And Viewing Your Web Page
Once you have completed your web site, you can upload it from within FrontPage.
Please see our tutorial
Uploading Your Web Pages Using FrontPage 2003
to learn how to do this.
NOTE: If you have any files you do not want to upload to your web
server, such as your TEMPLATE.html file, right click on the file in the Folder
view and select Don't Publish. This puts a red circle with an x by the
file to indicate that the file will be skipped when uploading it to your web
server.
|

