Uploading Your Web Pages Using FrontPage 2003
While Active Web Hosting does not support FrontPage extensions or SharePoint,
you can still use FrontPage 2003 to
create a web site and upload it
to your web server. This tutorial will show you how to use FrontPage to upload
your site. Keep in mind that FrontPage does not allow you to create directories
on your remote server, so you will need to create the directory on your hard
drive and upload that directory to your server. In addition, FrontPage is not
suited for uploading to your CGI server, as it does not allow you to change the
file permissions.
Be sure the web site you would like to upload is selected. In your folder view,
select any files you do not want published, then right click and select
Don't Publish. These files will be skipped (ie. not uploaded) when you
upload your web site.
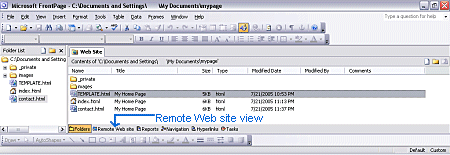
Click on the Remote Web site view from the bottom of the screen, just
above the bottom tool bar.

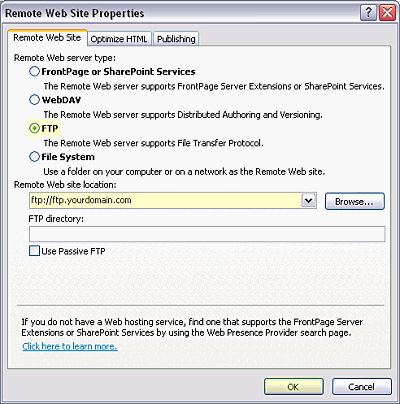
Click on Remote Web Site Properties in the upper right. Select FTP,
then fill in your FTP site. Note that this must start with ftp://
and use your own ftp host name (which is ftp.yourdomain.com where you
should replace yourdomain.com with your actual domain name). Click the
OK button when done.

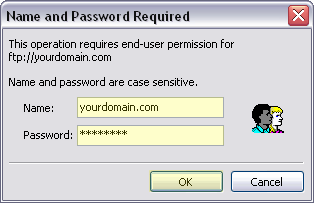
Next you'll be asked for your username and password. The username is usually
your domain name (ie. yourdomain.com for example). Use your FTP password.
Click OK to connect.

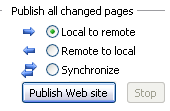
Once connected, you can upload your entire site by selecting all the files and
directories you want to load in the left pane, and selecting Local to remote
in the lower right of the screen. To upload only changes, use Synchronize.
Press the Publish Web site button to start transfer. Note that if you
do not select any files but use Local to remote, your entire web
site will be uploaded (excluding any files you marked not to publish).
NOTE: You may get messages notifying you that a file or group of files
are on the web server but not on your local hard drive, and ask you if you want
those files removed from your web server. Press the No to All
button to skip these files. This is particularly required in the case of your
log files, as you do not want to remove them.

Once the message appears in the Status area at the bottom of the screen that your
site was successfully uploaded, you can disconnect by going into the File
menu and selecting Close Site.
To rename a file or directory: Right click on the file or directory and
choose Rename. Then type in the new name. You may have to click in the
right side pane again to see the changes.
To delete a file or directory: Right click on the file or directory and
choose Delete.
|

