KBear 2.1 for Linux
When you start Kbear for the first time, you'll see the Installation Wizard.
Click the Next button and follow the instructions. Normally you'll not
need to change much, if anything. Do note that this tutorial was written with
KBear in Child Frame mode (Window Settings, during the Installation Wizard).
Once Kbear is set up, go to the Sitemanager menu and select Kbear
Sitemanager.
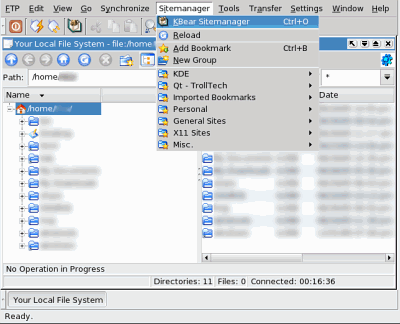
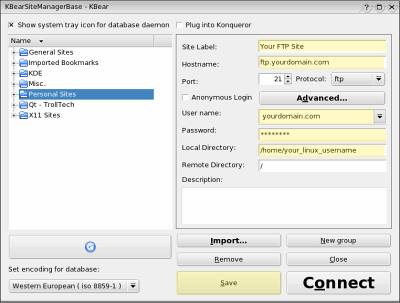
Click on Personal Sites in the left list. On the right hand side, fill in the
following:
Site Label: Enter a name for your FTP site that you can remember it by.
Hostname: ftp.yourdomain.com (Replace yourdomain.com with
your actual domain name.)
Be sure Anonymous Login is unchecked.
Username: Click in the box that says anonymous and type in
yourdomain.com (Replace yourdomain.com with your actual domain
name.)
Password: Your FTP Password.
Local directory: /home/your_linux_username (or where your actual home
directory is in Linux).
Click the Save button when done. The site will now show up under
Personal Sites in the left list. At this point, you may click the
Connect button or click Close.
Refer to the image and information below on how to navigate and change files
and directories:
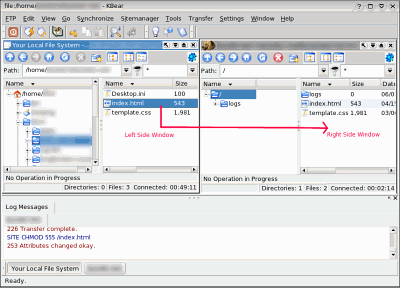
To Upload a file: Drag the file from the left window to the right window.
To Rename a file: Right Click on the file on the right window and select
Properties. Type in the name and Click the OK button. Then click
in that same window and press F5 to refresh and see the newly named file.
To Delete a file: Right click on the file in the right window and select
Delete.
To Create a directory: Right Click in the right window and select
New Directory... Type in a name and Click the OK button.
To Delete a directory: Right Click on the directory in the right window
to delete, and select Delete.
To Rename a Directory: Right Click on the directory in the right window
and select Properties. Type in the new name for the directory and Click
the OK button. Then press F5 in the window to see the newly named directory.
To Change File Permissions: Right click on a file or directory and select
Properties. Click on the Permissions tab. Note that permissions
are not set numerically, ie. '777' or '755', etc. You will want to put an 'x'
in the permissions you want to set. Do not set any permissions in the
Sticky row. User refers to you, the webmaster. Group is any
in a group of users, and Others means public, or anyone visiting your
site. Usually you want to set things up for only you (User) or for Group
and Others if public. When changing file permissions, Exec means
executable.
To List all files (including .htaccess): Right click in the right window,
and go to View, select Show Hidden Files.
To disconnect from your server: From the FTP Menu at the top,
select Close Connection.
|
