Setting Up AceFTP 3 Freeware
Brief Introduction:
AceFTP is a Freeware File Transfer Portocol utility. It enable you to transfer
sever files from your hard disk to your webserver. Using the Drag-and-Drop
interface it makes it easy for any level FTP'er to use it. This is one of the
most user friendly FTP out on the market today.
To download the Freeware version of AceFTP visit
http://software.visicommedia.com/en/download/
scroll to the bottom where the bold words read "Freeware". Follow the on screen
instructions and you'll be enable to download the Freeware version. You are able
to use this software forever if you like. There is NO 30 days trial period.
Creating a Site Profile:
In order for you to be able to connect you will need to set up a "Site Profile".
To do so follow my step by step instructions. Note that when the program first
starts, you will want to click on "No" when asked if you want to use a wizard to
import from other FTP programs.
File >> Connect >> A window should pop up. From there you'll be able to see
a folder that reads "New Site Profile" double click on that folder.


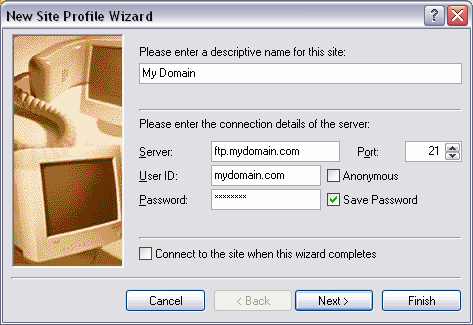
Another window will pop up asking you for a Descriptive name for the site.
You may name this whatever you wish. It will then ask you for your Server, User
ID, and Password. You may check "Save Password" if you like, but it is not
neccesary. Note: For Server, you want to use ftp.mydomain.com where
mydomain.com represents your domain name. For User ID, type in your actual
tomain name. Click Next.

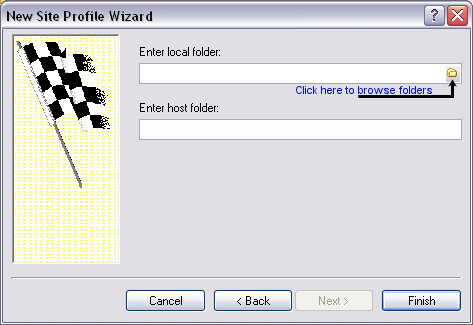
The next window will ask you to Enter a local folder and to Enter a host folder.
Click on the folder icon on the right of the Enter local folder icon to
browse to the folder where you keep your web pages on your hard drive. Leave
Enter host folder blank and click Finish.

Now, You have succesfuly created a Site Profile. The site profile should now
appear on the lit of sites. Remember it is named by what you enterred on the
Descriptive name for the site.
Connecting and Uploading:
Now that you have created your site profile you will like to connect to your
FTP server. You may do so by following the steps below.
File >> Connect. A windows will now appear with a list of site profiles.
Double click the one you recently made as we discussed in this tutorial.


When you double click the window will disappear and you'll see the white box on
the main screen with awhole bunch of information verifying your username, host,
and password. Once you are connected succefuly you'll hear a sound.
Now to upload you see at the bottom of your main screen there is two individual
boxes. One which locates all the files on your computer harddisk and the right
on which show's your hosting server (FTP server). Just select the file you would
like to upload and click on the arrow pointing to the right. A window will
appear showing you the upload status and how much is left until it is completed.
Note that you can select more than one file by holding down the CTRL key and
clicking on additional files you wish to upload.

When you're done, go to the File menu and select Disconnect.
Congratulations. If you have been able to create a site profile and upload then
you have followed the correct steps. However, If you encounter problems feel
free to contact me at inferred@gmail.com.
Thank You and Good Luck!
Using Other FTP Commands:
Changing Folders: If you wish to transfer files to another folder in your
web space, double-click on the folder in the web space window.
Deleting Files: To delete a file, right click on the file and select
Delete.
Renaming Files: To rename a file, right click on the file and select
Rename.
Creating A New Folder: Right Click in the web space window and select
Create New Folder. Type in a new name for the folder.
To Change File Permissions or use CHMOD: If you are installing a file that
requires certain permissions to be set, right click on the file to change and
select Properties.
|

