Using MailWasher Pro 4.1.9 To Control Spam
MailWasher Pro is a program which will allow you to filter your email before you
actually download it to your email client program. With MailWasher Pro you have
full control over your email filtering on any POP based email address you have.
MailWasher Pro does not work with most web-based email, except hotmail. Further,
MailWasher Pro can also send an authentic-looking bounced message to the sender.
This is useful in cases of spam where instead of verifying your email address is
working, it will notify the spammer that the address is no longer working and
thus there's a better chance that your address may be taken off their mailing
lists.
NOTE:
When you run MailWasher for the first time, you may click on the Automatic Setup
button to have MailWasher set up with your existing email addresses from your
existing email client program. This program does not seem to detect some email
client programs such as Mozilla Thunderbird. This tutorial assumes that you are
not using the Automatic Setup and that you clicked the 'x' in the upper right
corner of the window to close it.
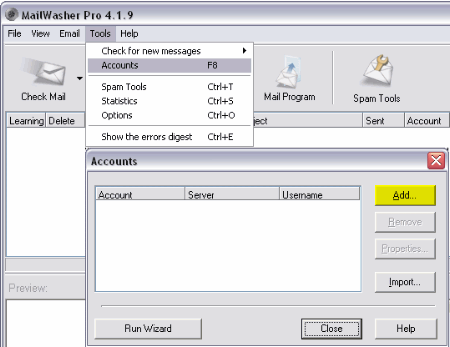
Setting Up Email Accounts
From the Tools Menu select Accounts. Click on the Add button.
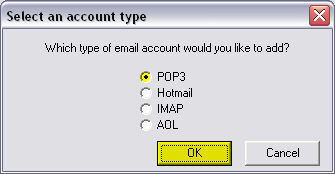
Be sure POP is selected and then click the OK button.
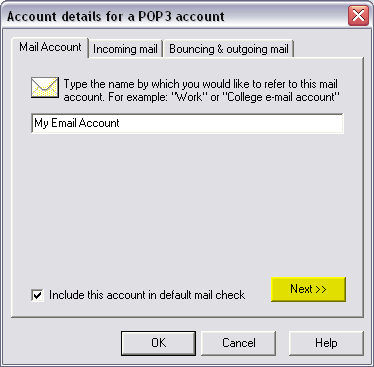
Type a name to call this email account. This can be anything that will help you
remember what account this is. If you want that address checked automatically
during every check, then click on the box next to Include this account in
default mail check. Click the Next button.
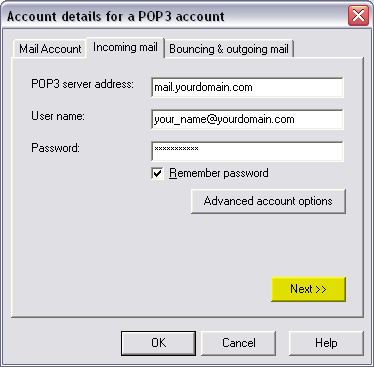
Type in your mail server address. This is usually something like mail.yourdomain.com
where yourdomain.com should be replaced with your actual domain name.
Then type in your email address (not just your username) and password for that
account. Be sure the box next to Remember password is checked if you want
the program to not ask you for a password on each mail check. Finally, click the
Next button.
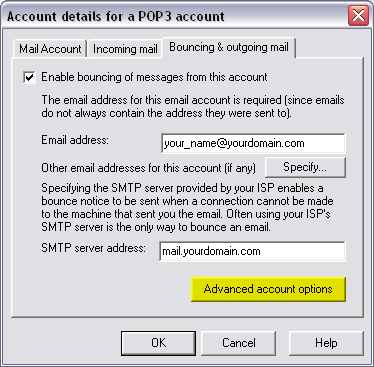
Be sure the box is checked next to Enable bouncing of messages from this account
if you want MailWasher to be able to send a bounced mail message to spammers so
that they might think your address is invalid and maybe take you off their list.
Next type in your email address again here. We need to do this because not all
spam mail would have your actual email address in the headers. This way the
the program will always report to spammers that this particular email is
not valid as far as their concerned.
For the SMTP server address, type in mail.yourdomain.com replacing
yourdomain.com with your actual domain name. This should be the exact
same as your POP server address.
Click on the Advanced account options button.
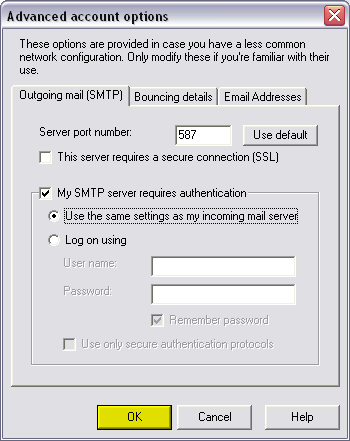
If you must use a different SMTP server port in your email client program to
send mail from your Active Web Hosting email accounts, then enter it in the
Server port address box. This is usually 587.
Check the box next to My SMTP server requires authentication. Choose the
Use the same settings as my incoming mail server.
Click OK when done. Then click the OK button in the Account
details for a POP3 account dialog box. Click Close in the
Accounts dialog box.
Set up your other email addresses in the same way.
Setting Up Your Filtering Options
Any email addresses or domains added to this list will be not be deleted from
your POP server, so that your email client program can download them to your
inbox.
Click on the Spam Tools button at the top of the window. In the next dialog
box, click on the My friends list icon, then click the Add button.


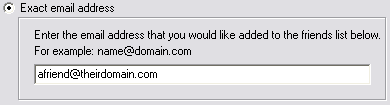
If using the Exact email address method, type in the email address of the
friend you want to add to your list. Optionally, you could also specify all or
part of a domain. This might be useful for work accounts, mail coming from your
domain, or mailing lists you are subscribed to.
Click on the My blacklist icon, then click the Add button and
add addresses or domains from those you do not wish to receive email from.
Also, you may want the following options to have a check in the box next to them:
Mark the email for deletion and Mark the email for bounce. The
first option will delete the email from the server so you do not download it to
your email client program's inbox. The second option will cause MailWasher to
send a bounced email message to the sender making it look as if your email address
is invalid. This might get the spammer to remove your email from their mailing
list.

Click on the My filters icon. You might want to put a check in each of
the boxes that are already provided. Those are usually a good place to start. To
add more filters, click the Add button.

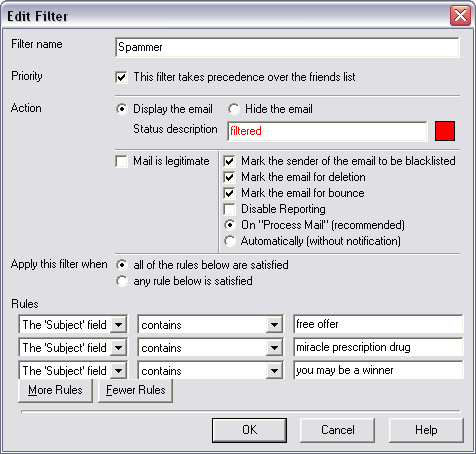
Type in a label for Filter name so that you can distinguish it from your
other filters.
You may want to check This filter takes precedence over the friends list
box if you want these conditions to be checked first. That means if any of these
conditions are true, the actions specified will be taken even if it is email
sent from someone on your friends list. Leave it unchecked if you do not
want these conditions to apply to your friends list email addresses as well.
Click on the colored box on the right to change the color of the filter. You
can also type in a name for the filter type. This is useful to further organize
your filters for easy identification.
Next you get a choice of several actions. The ones marked will (in order) put
the email address of the sender on your blacklist, mark the mail to be deleted
from your mail server, and make MailWasher send a bounced mail message to the
sender so it would appear to them as if your email address is not a valid one.
It's also recommended to use On "Process Mail" so that you can catch any
mail that you may want to go through after all before any action is actually
taken. This is useful if your friend sent a mail and you want it to arrive in
your email client program's inbox.
Now you can set up the rules. They are pretty self-explanatory and the drop
down boxes give you many choices on which to create rules. Here is an example
of making several rules based on the subject line. For ideas on what keywords
to filter, please see
Spam Keywords To Add To Your Filter Lists.
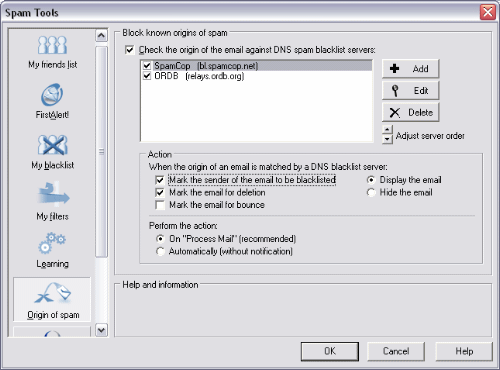
Click on the Origin of spam icon. This screen lets you set up so that
your can have the email checked against known spam lists. Active Web Hosting
already does this so you can leave the box next to Check the origin of the
email against DNS spam blacklist servers unchecked. The other areas should
then be grayed out and inactive. However, you may want to have this checked for
other mail servers. You can then also choose the action to be taken when such
an email is encountered, such as deleting the email from the mail server and/or
sending a bounced mail message to the sender.
At this point, you can click the OK button and you should be all set up.
You can click on the 'X' button at the top right of the window and MailWasher will
set in your system tray and monitor your incoming mail for you, and filter it
according to your settings.
There are many more options you can set in MailWasher which can not all be covered
here. For more information, please see the MailWasher Pro
web site.
|
